Setting Up Azure Managed Identities for Measure IQ
The purpose of this document is to provide some general knowledge about Managed Identities, information about where and how they can be used in Measure IQ, and what a Measure IQ customer should set up to allow us to connect through Managed Identities authentication.
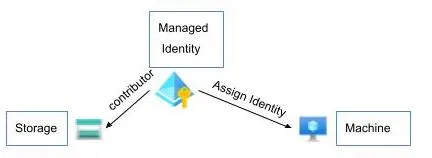
Managed Identities is a way to authenticate access to the Azure Cloud without using passwords and vaults.
Let’s say you need access from a Machine to a Storage Account or Blob/Container. In that case, you’ll create a Managed Identity and provide it to both parties. Our Storage will be the contributor, while the Machine will know it as an assigned identity.
The identity creation and assignment are done through the Azure portal.
For more information see official Microsoft documentation: https://docs.microsoft.com/en-us/azure/active-directory/managed-identities-azure-resources/qs-configure-cli-windows-vm
Managed Identities authentication can currently be used in two scenarios:
- Import - reading/downloading data from Azure
- GDPR purge request & receipts - writing/uploading data to Azure
In our system, there are several machines that require the Identity to be assigned to them:
- config
- data (all machines)
- import (all machines)
- string (all machines)
- Go to
Azure portal \ Managed Identities. - Press
+ Createin the toolbar. - Fill in the form and press
Review + create. - Press
createat the bottom of the new form. - Go to
Home \ Managed Identities \ <the identity you've created>. - Copy the
Client IDand send it to your Measure IQ representative.
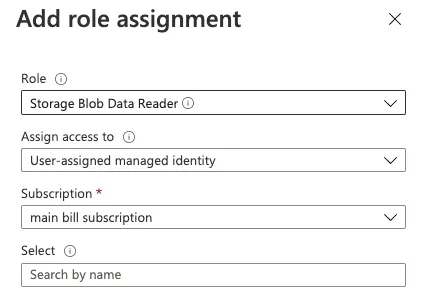
- Go to the relevant resource in the Azure Portal, such as
Storage account(for import). - On the left panel go to
Access Control (IAM). - Press the
+ Addbutton, and selectAdd role assignment. - Fill in the form as follow. you’ll need to do it twice for 2 different roles:
- Storage Blob Data Contributor
- Storage Blob Data Reader
- Press
Save.
Assign the Identity to the accessing machines
Section titled “Assign the Identity to the accessing machines”- Go to the relevant machine in the
Azure portal. - On the left panel go to
Identity. - Go to the
User assignedtab. - Press the
+ Addbutton. - Fill out the form on the right and select the identity you’ve created.
- Press the
Addbutton at the bottom.
That’s it! Don’t forget to send us the Managed Identity Client ID.